Today I wanted to share the truths behind making a cardboard tractor. I have read many Pinterest articles where parents have made these before and to be honest I found something's that worked better for me. But no big deal, we all do our own thing and the perfectionist in me may be flaring up with some OCD traits.

The supplies you will need:
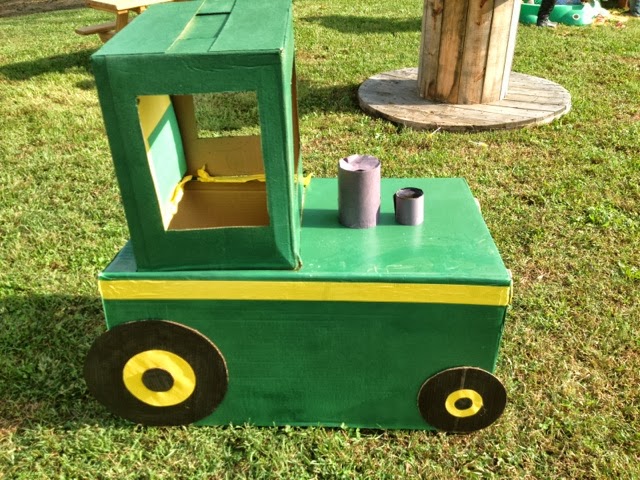
1 large rectangle box (as you can see I used a carseat box)
2 smaller boxes (1 for the hood & the other for cutting the tires from)
1 oatmeal canister
5 cans spray paint (I purchased the cheapest)
2 clean soup cans
1 large sharpie
1 yellow duct tape ($1 at Mighty Dollar)
Box Cutter
Optional:
4 peices of yellow construction paper
2 peices of green " "
4 peices of black " "

Next, go to town spray painting your boxes. As you can see I had one brown box and one white. Both were hard to cover up. I had purchased 2 cans of paint but ended up having to buy 3 more. I wanted his tractor to be very green - John Deere green. I did make several runs in the paint but I just tried to over look it as much as possible.
After drying trace your holes for the headlights and stacks. Then gently cut. If you make a mistake, it is okay! The cans need a little extra room.

I used soup cans covered in construction paper and duct tape for the headlights.

For the stacks I covered an oatmeal canister and one old spray paint can. You must use two cans or else your tractor will look like a train!!

I covered half of each with construction paper as well. If you cover the entire can, it will be to tight to fit into the hole that you have cut. It was much easier to me using construction paper then buying extra spray paint and killing my poor pointer finger even more so.
Next, trace with a book or other large item for the windows on your cab. Be careful to not bend the box while cutting.
Tape or hot glue the cab to the body of the tractor. I sadly forgot to take a photo of this step. But you get the point. You want your cab to be secure because little ones can be rough.

It is completely optional to cover the back of the cab with spray paint or construction paper. I had purchased extra and like I said, I was tired of painting so I had Charli help me with glueing the paper. It is also optional to make a yellow line with duct tape. But it gives more of a John Deere feel including it. I am pretty sure that yellow tape is $3.97 at Walmart and I found it for $1 at Mighty Dollar.
The last thing you will need to do is cut your third box into squares. Then find a large plate to trace the back tires and a smaller plate or bowl for the front. Trace these four our on the box, then cut.
I personally decided to use a sharpie one day during lunch to color in the tires. It was easier to me at the time but black spray paint could work as well.

Then make 4 smaller circles out of the yellow construction paper to place in the center. This will help give the wheels and tires a more "real" look. It helps give the pop of color as well. I used extra cardboard for the center circle and colored in with sharpie. The wheels/tires were probably the easiest thing for me to accomplish.
I also got glued these bad boys on. Who could handle their wheels falling off while trucking along?
Overall making this was really not that time consuming. I split my building process up in days and had a little extra help out of Charli Beth.
I had originally planned to take photos of our smaller guests in the tractor to share with parents. But the rain took over that idea as we had to move into the barn and we were out of room. The best thing about making this is how much Bryar loves it. He loved seeing it and getting excited for his birthday party. I plan to keep it for a while and then pass along to someone else hosting a tractor party.


1 comment:
My little Mason would go crazy over this. He is obsessed with all things tractors!! Great job! I am showing this to him when I pick him up from school.
Post a Comment